A project: the urban ninja
The urban ninja has made floating in the city popular all around the world. How to build the kite for zero and light wind? This original plan will show you, step by step. Celebrate the new urban flying style without wind.
Build your own lightwind kite and fly with it in horizontal gliding, flatspin or diving mode. Just playing around. A kite designed for reactive flights in the most gentle of breezes or without any wind in confined urban areas like parking lots, courtyards, parks and indoor.
In normal to stronger winds it just hangs up there, cool for kids and especially teens too.
The kite made urban floating popular all over the world and established this new genre. For many, it is an uncomplicated introduction to the world of single line zero-wind kites in general, which is our main invention.
Make the kite
A kite plan for non commercial, private use: © ch 2026 horvath.ch
When the winds are becoming too gentle for most kites, grab your ninjas and hang around a bit together in the sky. Choose your setup:
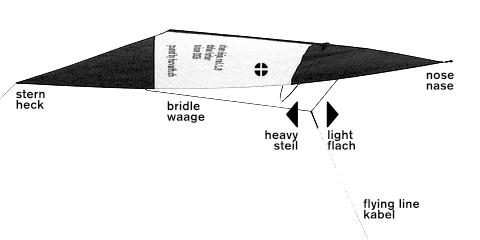
bridle 610 mm for agile moves
bridle 630 mm for the normal style
bridle 650 mm for laidback flying
You will search and find the sweet spot of the bridle geometry yourself, so you can celebrate your personal urban floating style.
The urban ninja is a regular production kite of the kite lab™. With this plan you can make a kite which is similar to the original "the urban ninja ul", manufactured and distributed by us.
Nominal span: ca. 1'360 mm, 4.5 ft
Height: ca. 1'000 mm, 3.3 ft
Weight:
from 61 g, 2 oz with Icarex and relatively common ø 3 mm carbon tubes
from 52 g with our building kit
Unfolded sail area: 0.71 m2, 7.64 sq ft
Effective wing loading in horizontal flight: from 84 g/m2, 0.26 oz/sqft, depending on the materials used.
Units:
1 mm = 0.0394 inch, 1 inch = 25.4 mm or 2.54 cm, 1 m (meter) = 39.4 inches
10 newton = 1 da'n = 1 kp = 2.2 pounds [lb], 1 newton = 0.22 lb
Our 320 n bridle line is equal to a 70 lb bridle line in USA (such a sleeved line is 1 mm = 0.04 inch in diameter, and 0.6 mm = 0.02 inch when pressed with the gauge or in a tighten knot), this will be one the lightest bridle line you can get.
1 list of material and templates
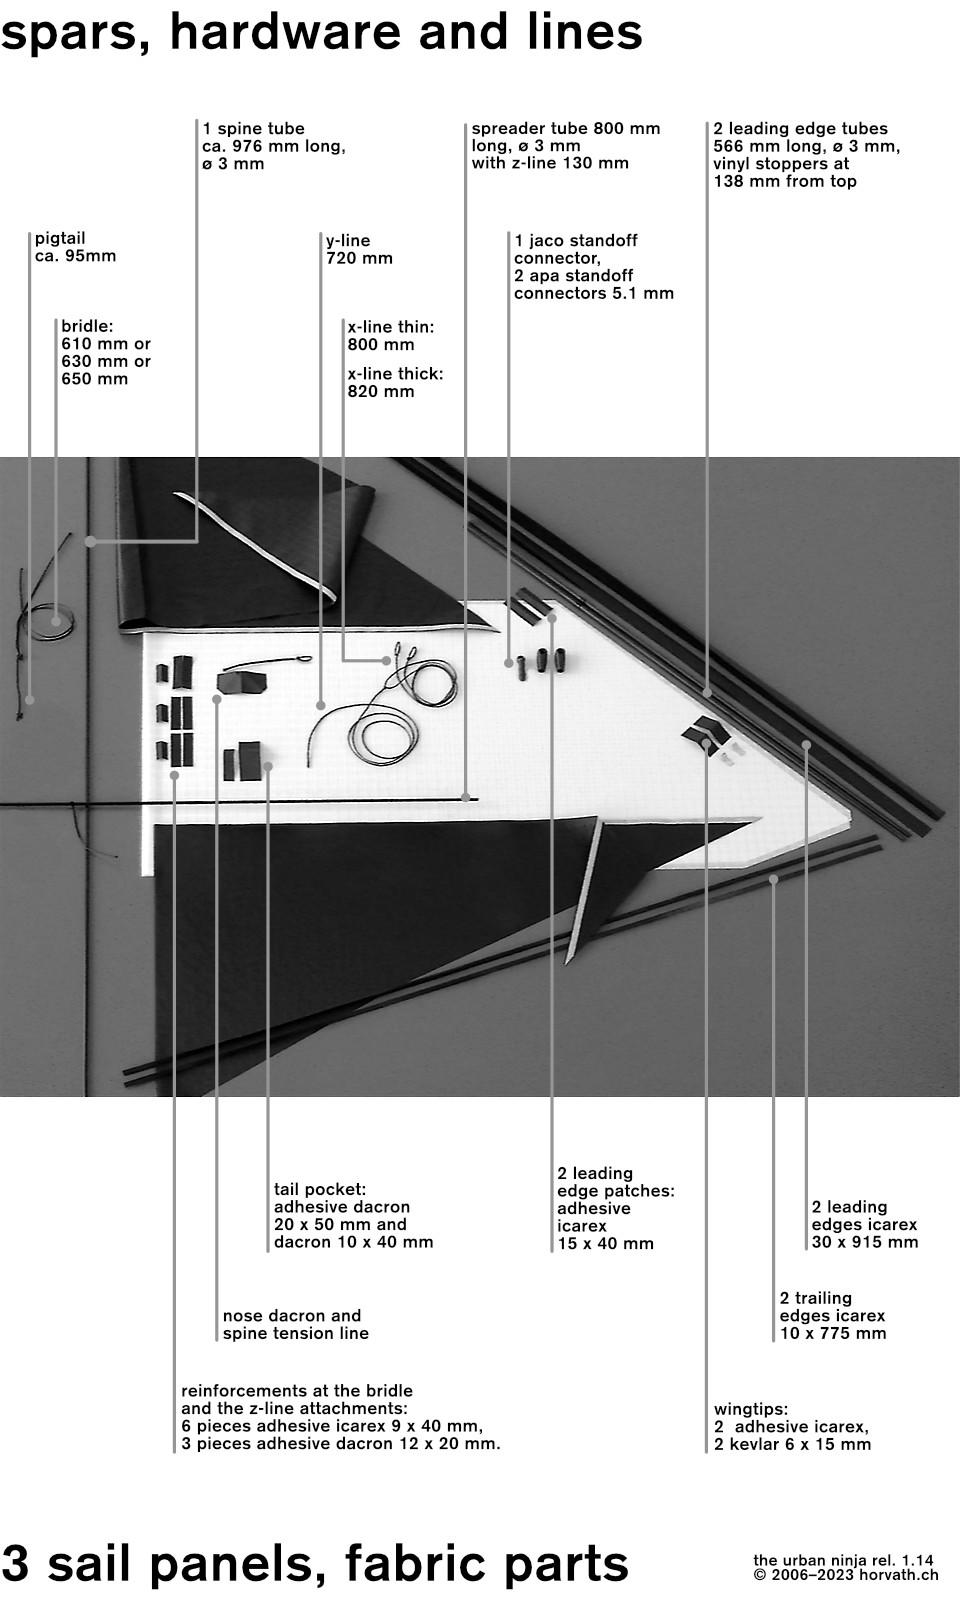
The carbon tubes used in the kite are Avia.125 - 3.1 mm, 7.5 g/m. They come mostly in lengths of 1 m or 2 m, that's roughly 40 inches or 80 inches.
And now to the kite making: Please read this kite building turorial and plan completely, then start preparing all the parts shown on the bill of material.
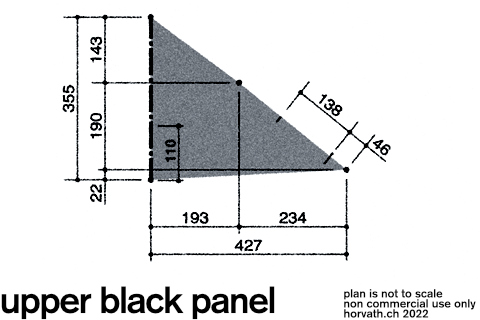
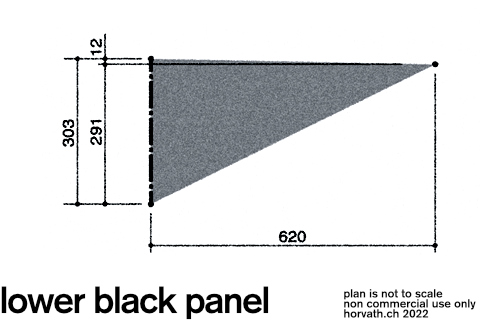
When done, print the cutting pattern:
Cut away the part left of the center fold of the panels. Punch 3 mm holes at the corners, spine and leading edge marks. The dimensions are for cutting the panels, including the 6 mm overlaps and the boundaries, that will reside in the leading and trailing edges of the completed sail. The 110 mm dimension shows the upper bridle connection.
The best method is drafting the shapes onto the folded sail.

The pictures in this kite building plan are often showing details quite big, taken from a short distance. As a clue, you can take the squares in the Icarex cloth to determine the scale of a pic: They are roughly 10 mm, or two and a half of them are an inch.
Western kite builders, making designs such as rokkakus, reltas, genkis or codys etc. may be surprised how small and accurate the details of an urban ninja are formed. On the other hand, people involved in indian fighters or North American fighter kites, will have to imagine the kite and its details in double size.
2 cutting and assembling the sail
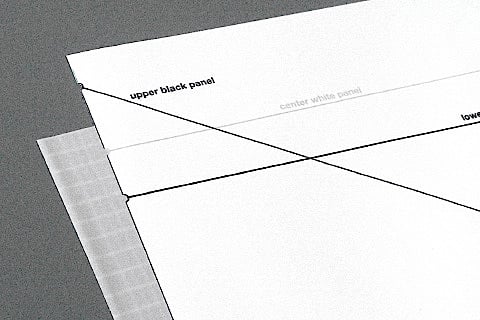
When using the template, fold an Icarex panel sharply, lay the template on top of it and align the left edges of both.

Mark all the points through the holes, including the bridle and leading edge marks for the upper black panel. Remove the template, then cut the still folded panels with a straightedge and a sharp cutter.
For the leading edge marks of the upper black panel cut a small wedge as guide for drawing the marks on both left and right sides of the panel.

Press transfer adhesive tape, 6 mm or 1/4 inch wide, to the back side of the black panels, leaving a few millimeters free at the center fold. Place one half of the white panel over the highly visible tape liner and roll it back. Remove the liner slowly and let the white Icarex drop back onto the adhesive tape.
The overlap of the panels is 6 mm or 1/4 inch. Using 5 mm wide tape, as we do on our production ninjas, there are nice 0.5 mm of Icarex left on both sides of the tape, protecting the adhesive from dust or sand.

Lay the left side of the white panel on to its right side, adjust the position for a good symmetry. Remove 1/2 inch of the tape liner at the center and fold it tightly up at 90°
Lay the left side of the black panel onto the white panel, adjust the position accurately and lock it with weights. Pull out the liner very slowly, be careful not to displace the panels. Press the black Icarex to the tape with the fingers, do not rub to avoid distortion of the seam.
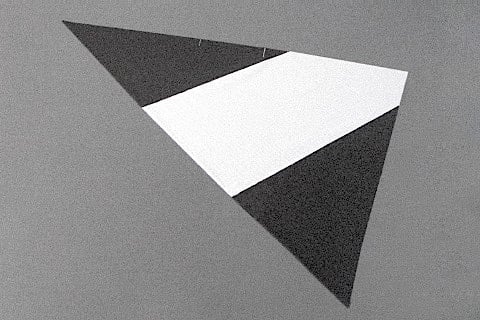
The assembled sail of the kite with the profiled keel: Last chance to check for perfect symmetry.
Should your finished flying kite lean to one side later in the sky, you can correct this by several setup adjustments and tweaks.
3 sewing the sail
The back side of the kite: the panels sticked together with standard 6 mm wide tape, which is exactly the measurement of the overlap.
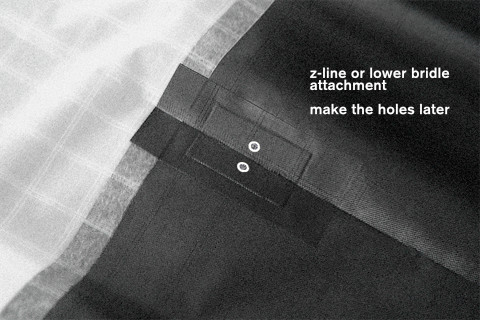
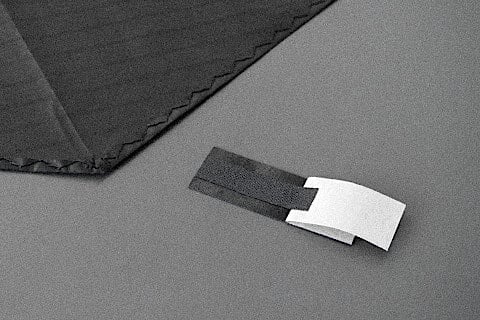
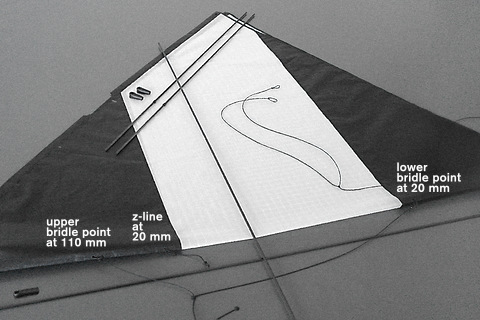
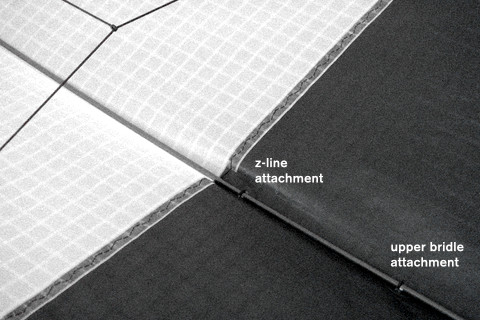
Before sewing, make compound patches of an adhesive Dacron 12 x 20 mm and two adhesive Icarex pieces 9 x 40 mm. Place the compound patches for the bridle and the z-line attachement exactly at the center fold. Two of them start on the white panel, this will make three layers at this tension loaded point.
The upper bridle attachment is centered at 110 mm above the end of the black panel or 104 mm from the end of the white panel. That is 245 mm from the nose tip. then triple zig zag the panels together, 4 mm wide and 3 mm long is a nice stitch. At the center you may shorten the stitches to 1.5 mm to improve resistance.
The front side of the sail, the black panel is on top:
Sew first the folded Icarex trailing edges, avoid tensions as much as possible. Maybe a long double zig zag, reduced upper and lower thread tension and a double fabric transport will help. Then sew the leading edges with a narrow medium length triple zig zag.
4 the leading edges
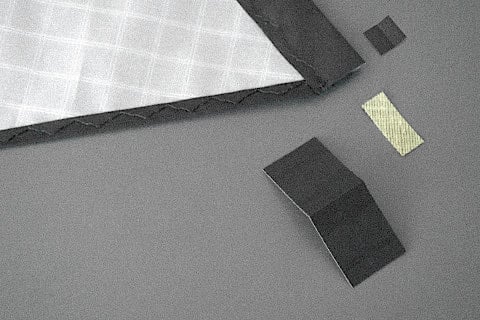
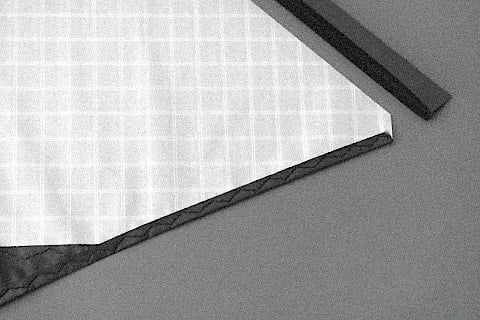
For the wingtip cut pieces of Icarex-coated kevlar 6 x 16 mm and self-adhesive Icarex 10 x 10 mm and 16 x 40 mm. Stick the small adhesive Icarex patch at the outer end of the leading edge.
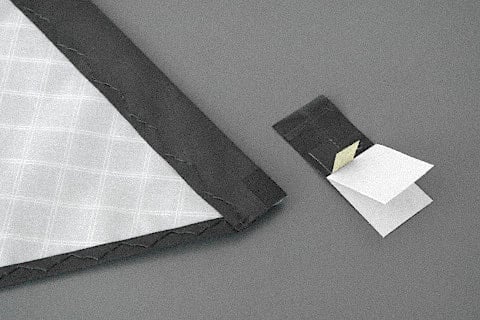
Fold the Icarex piece sharply, fold the paper liner back and place the Kevlar or Dacron reinforcement onto the adhesive in such a way that it lies 1 to 2 mm from the outer edge of the leading edge on the finished kite.
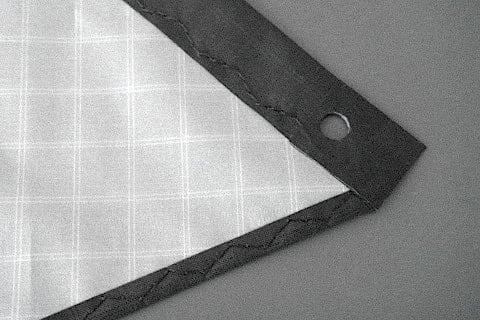
Stick half of the Icarex piece to the leading edge using the fold as a positioning guide, turn the sail and press the second half down to the back side. Punch a hole with a diameter of 4 or 5 mm.
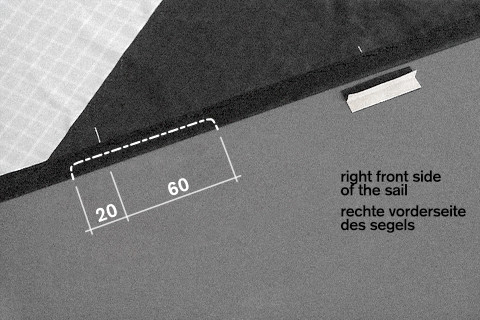
Place the leading edge spar reinfocement patch. Temporarily you may stick an additional layer here to protect this exposed point of the leading edge in hard city-flights on asphalt. Then cut out the leading edge: The opening is 9 mm deep and 80 mm long, the lower end at 20 mm, the upper end at 60 mm from the silver mark.
5 the tail and the nose
Make a compound of adhesive Dacron 20 x 50 mm folded at 30 mm and a piece of Dacron 10 x 40 mm for the spine end pocket. stick it accuratly aligned with the center fold of the kite and sew it to the sail with two straight stitches.
Front side of the spine end: melt the thread ends down and press them to the fabric (supported by product placement).

Back side of the spine end: punch or melt with a soldering bit two holes, diameter 3mm.
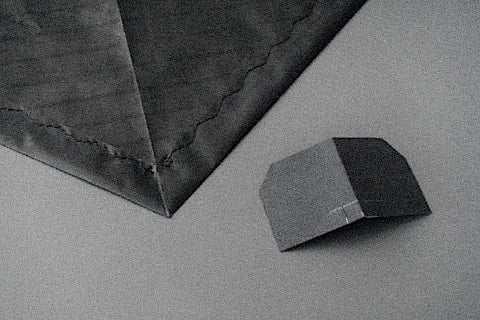
And now the Nose: Make a piece of adhesive coated Dacron 25 x 50 mm with two beveled corners and two cuts 5 mm long and 5 mm from the center fold.
Fold half of the paper liner sharply back and stick the nose piece to the sail, the sharp folds will help in positioning and centering accurately.
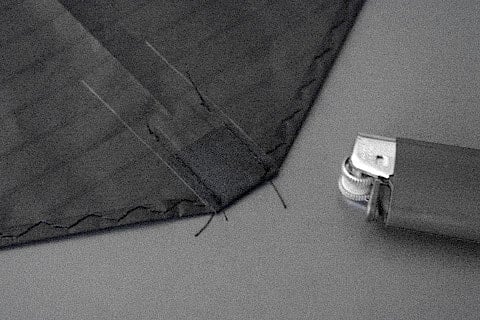
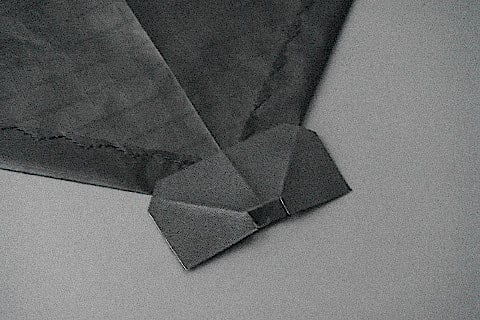
Sew the nose to the sail, seal the front tip with a lighter, and punch 3 mm holes. Prepare a bungi cord with good flanges at both ends.
Make a square knot or reef knot, called the "Samariter-Knoten" in Switzerland. Later, the accurately placed holes and the bungi will hold the spine exactly at the center of the kite.
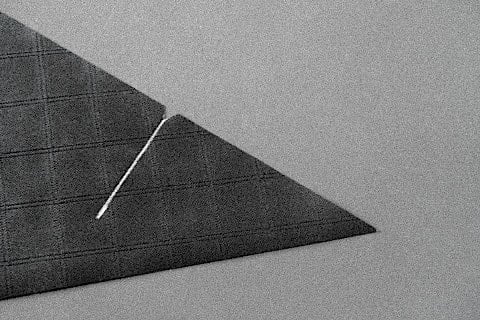
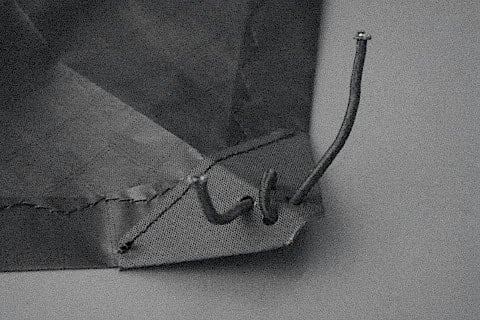
This detail can also be solved with a bridle-line, it's then possible to adjust the sail tension along the keel manually:
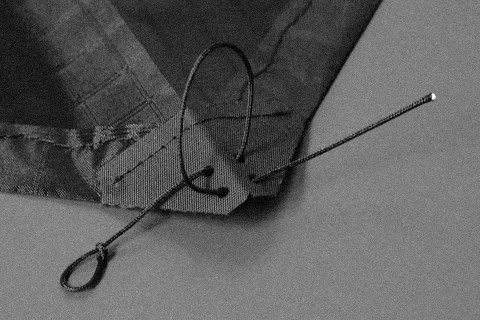
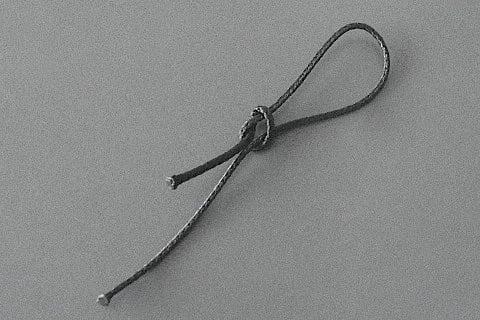
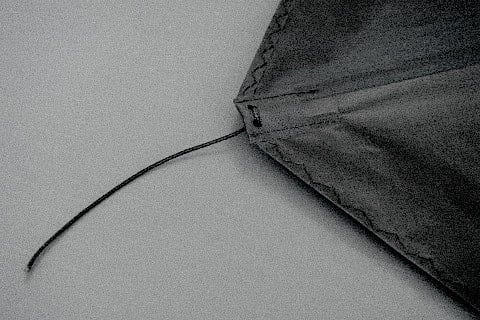
Make a line with a sharply tensioned pen-loop, see the next chapter how to do that. Start with a lenght around of 190 mm. Here you see a bridle line with an uncolored white Dyneema or Spectra core.
Go with the end of the line through the pen-loop, which you tighten seriously to get a nice friction. See the final steps at chapter 7 "assembling the kite". This detail is more process reliable than the bungi solution, so with the urban ninja kite building kit there's just bridle line included.
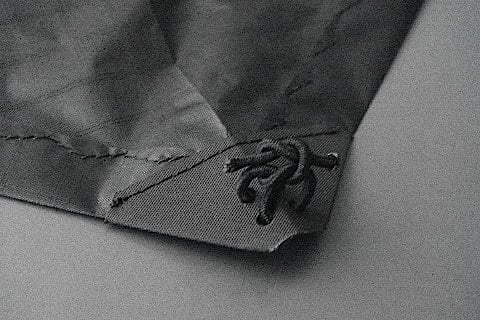
6 the pen-loops
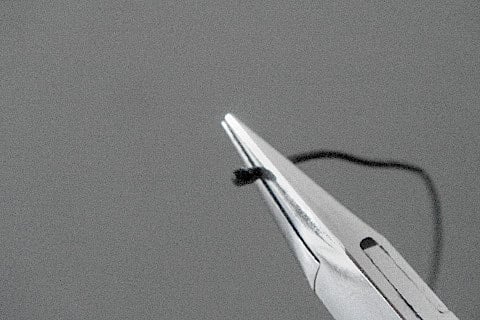
To make a flange: let 4 mm line out of the pliers. All given lengths of lines include this allowance: the z-line is 130 mm when cut, with the two flanges melted down it will be 122 mm, ready for the loop.
For a nice, compact flange: melt the bridle line and press it even and gently to the pliers with the plastic part of the lighter.
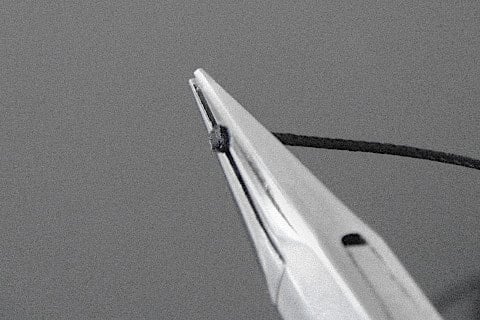
Make a loose loop like this: the line shown is the z-line which will pull down the spine to the spreader.
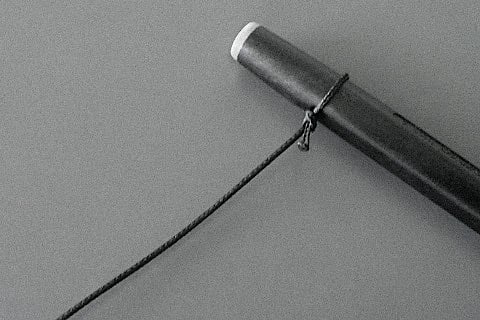
Lay the loop around a slightly conical pen and pull the line until the flange stops at the knot.
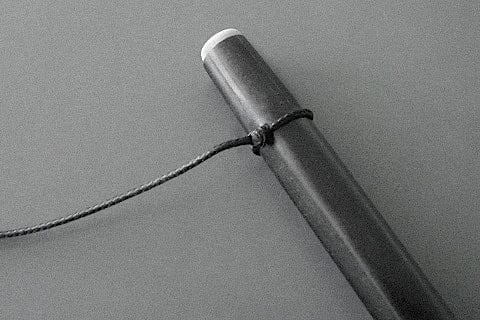
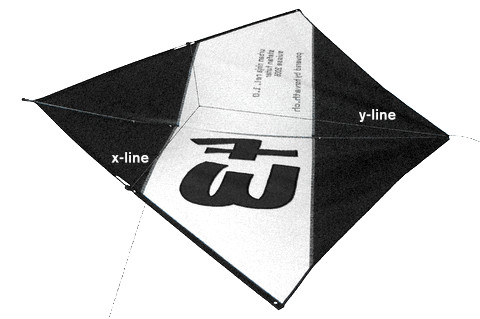
Tighten the loop around the pen to proof the strength of the knot. These loops are made directly on both ends of the x-line, at one end of the y-line and at one end of the z-line. And a very tight one for the nose tensioning detail.
7 assembly of the kite
Punch or melt with a soldering bit two holes, diameter 3mm, at the three reinforcements along the spine. We use to fold the sail to make each pair of the holes in one step, good for symmetry too.
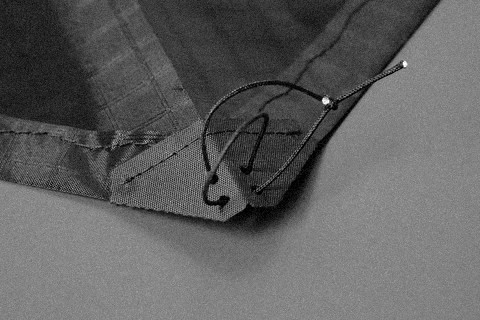
Tie the z-line and the two legs of the bridle to the sail and tighten the knots carefully, again with the pen, but leave the loops open for inserting the spine later.
The pigtail ends with simple overhand knots, stopped by a flange at each end. Larkshead the bridle around a knot of the pigtail.
Use the lightest bridle line you can find. We like our all black 320 n Spectra core bridle line, which equals a 70 lb bridle line (such a sleeved line is 1 mm = 0.04 inch in diameter, and 0.6 mm = 0.02 inch when pressed in the tighten knot). All lenghts given are for this line, if you are using heavyer stuff, add a few millimeters at each end. See more unit conversions at the top of the left column.
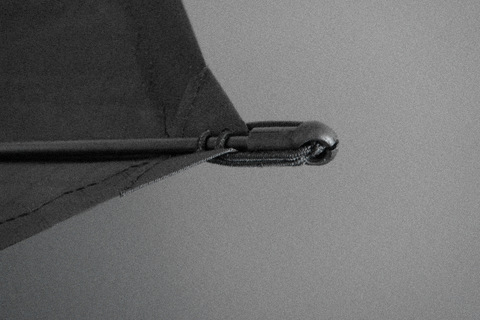
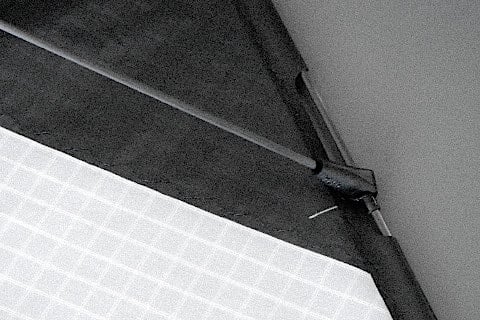
Insert the spine through the loops of the z-line and the bridle and into the tail pocket. Shown here the loop of the z-line near the seam and the upper bridle loop bottom right. Tighten the three loops. In the upper left shown the x-line with the attached y-line, the kite is assemembled on this photo. This is a production urban ninja, the panels are sticked together with 5 mm wide 9460 tape at the 6 mm overlap.
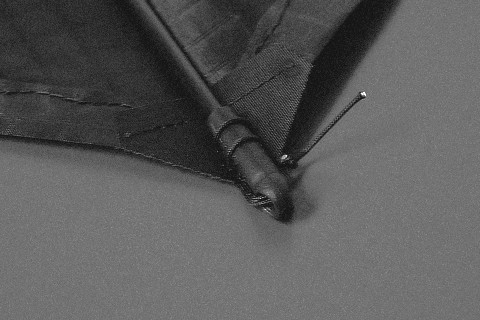
Tension the bungi at the nose, putting first the knot into the Jaco, then the remaining second loop.
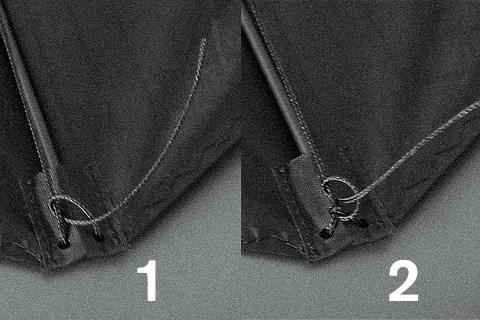
The finished spine nose detail, front side of the kite. The Jaco standoff connector is shortened here, but you can also leave it as is.
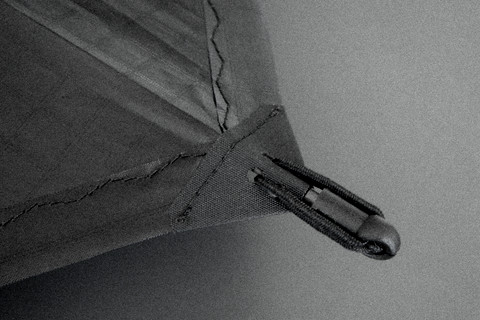
Here's the same detail with the bridle line solution:
Tension the black line by moving the tight pen-loop. A full length Jaco standoff connector is mounted here, but split a the ring for a convenient assembling.
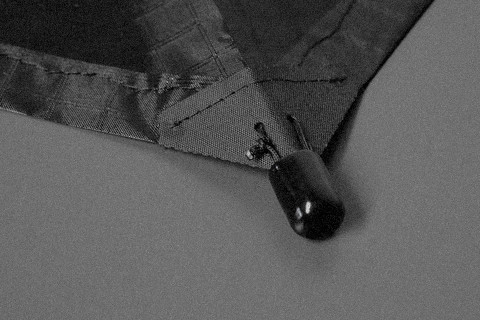
Cut away some of the line, leaving a few millimeters, which you seal with the lighter. This short piece will be your grip for adjusting. The vinyl-cap is optional, it's included in the building kit.
You may shorten the spine just a little bit, depending on then stretch in the fabric used. Most sail fabric will get longer under tension over time, especially if the sail is nylon spinnaker. So, better use icarex, which is polyester.
The less the sail is tensioned along the spine, the better. That's why we prefer the "line-solution" for dialing in just a nice zero tension.
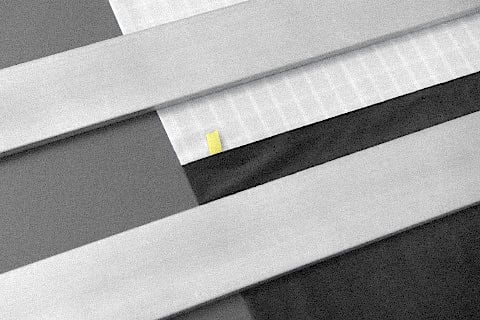
Make the upper ends of the leading edge tubes as round and smooth as possible by sanding them. The backside of the kite is shown. The upper end of the stopper is 138 mm from the top of the Avia.125 3.1 mm carbon le-tube.
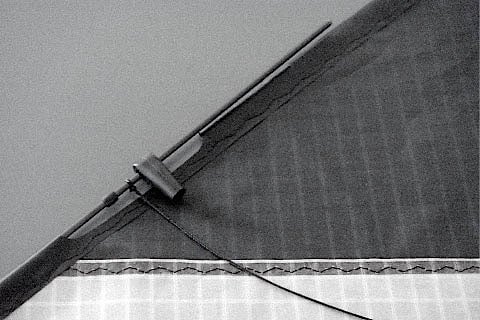
Insert the leading edge tubes fitted with the vinyl stoppers from top through the cutout into the leading edge and through the holes at the wingtip out again until the upper end is at the cutout. Place first the loop of the x-line above the stopper, then the Apa connector…
…and push the tube up into the leading edge. Move the x-line and the Apa down to the stopper.
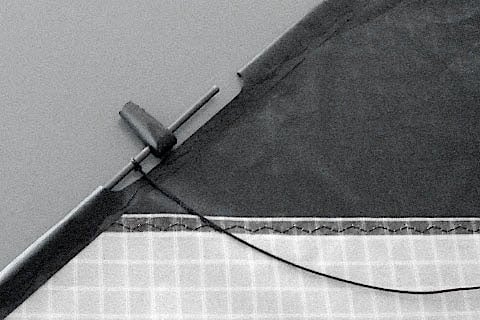
When assembled, the loop of the x-line should align with the silver mark on the sail. Shown here the front side of the kite.
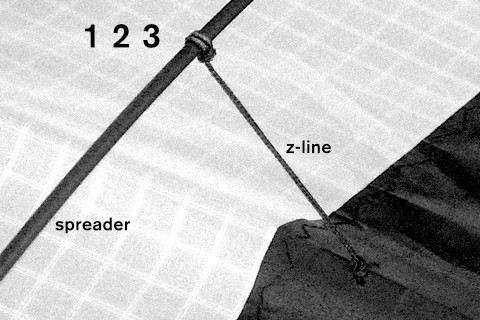
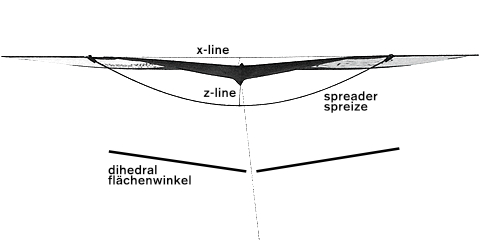
Attaching the spreader: Extend the loop of the z-line to form a double loop around the spreader. This is the neutral standard setup for all our kites. With a single loop, the z-line will be longer, with three loops it will pull and bend the spine closer down to the spreader.
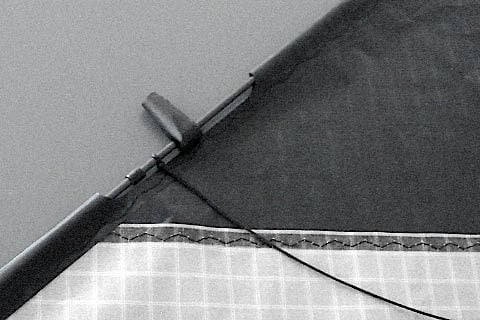
When flying in the city, protect the double loop with a tape or two small vinyl or teflon tubes around the spreader beside the bridle line. This will prevent erosion of the z-line loops at take-offs and landings on asphalt.
Now the kite is ready to being built up: Bend the spreader by holding both ends firmly and use the thumbs to place it into the Apa connectors.
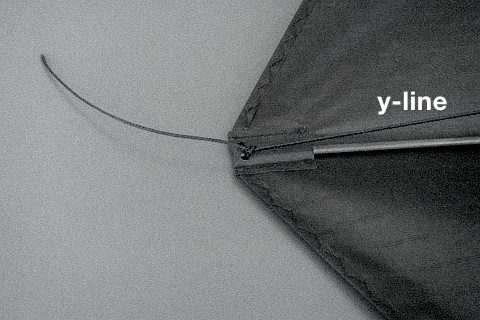
First setup of the y-line: at the tail use two half hitches to tie the y-line around the spine. The x-line should now be under tension and the sail should be slack.
The "double half hitch": the first half hitch of the y-line at the keel, then the second half hitch. The line goes around the carbon spine as well and centers it nicely.
Shown here the front side view of the kite, now ready to fly. For flights in the city protect the short section of the exposed y-line with tape, or go with the line through a short vinyl or teflon tube, which will contact the asphalt at take-offs.
8 typography and graphics
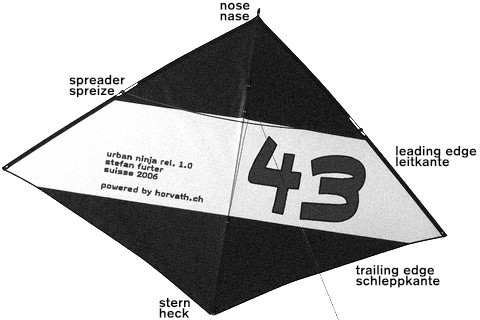
Draw the numbers onto both faces, the front side and the back side of the sail with a black marker pen. Stick a sample to the window to test the effects from an appropriate distance. We use comics-like fat fonts of course, like one called "field day filter", stretched horizontally. And numbers, which clearly indicate the orientation of the ninja on its wild flights, also from the back side.
Your name is printed to identify your personal kite on a crowded field, all urban ninjas look the same after all, or at least I used to think so.
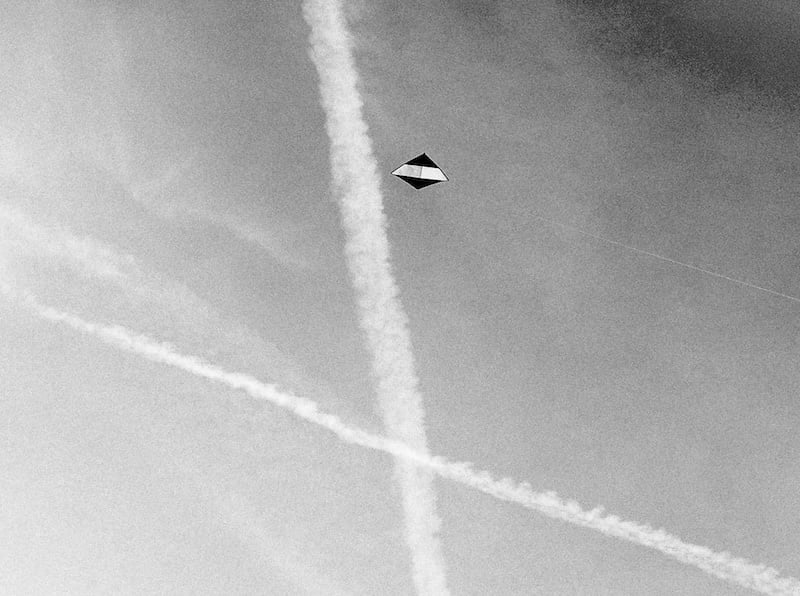
9 flights without wind
The following pics show the urban ninja with the standard setup: it will park at 60 m in medium to stronger winds. In zero or very gentle breezes it has a light, but responsive pull. The short fly aways or dives will show an extreme nose up tendency, so you will be able to turn back the kite towards you anytime. The urban ninja rolls backwards gladly and recovers to a nice short horizontal glide within a few meters. Slacken the line instantly after the impulsive pull to fly this and most other moves.
With a lighter bridle setting, the kite will fly more agile and respond to light, but sharp pulls on the flying line. This is good for the urban ninja flying style. Shown here is an aggressive, short and light bridle.
A quite important adjustment is the tension of the whole sail. Shorten or lenghten the y-line on the field to adjust the effective span of the spreader. This affects directly the span of the kite and the slack in the sail.
The urban ninja flies best with a very very slack sail, resulting in a deep billow and an accented keel area. A slack sail slows this fast little kite down. The airflow will pass a softer, flexible surface, especially if the Icarex is somewhat crinkly, hence adjust the y-line at will. The pictures show a rather tight sail.
The dihedral can be adjusted with the length of the z-line to vary the yaw stability in glides. As an additional effect of a shorter z-line the spine bend increases and flatspins become tighter, especially with this kite.

Lay out a lot of spectra line (called dyneema in europe) such as the zero.6 well sorted to the ground, attach it with a larkshead loop to the pigtail and lit off.
Never fly:
- higher than 60 m - 180 ft
- near airports or roads
- in stormy weather
- near powerlines and railroads
Enjoy your flight.
Thomas Horvath, Zurich, 2026
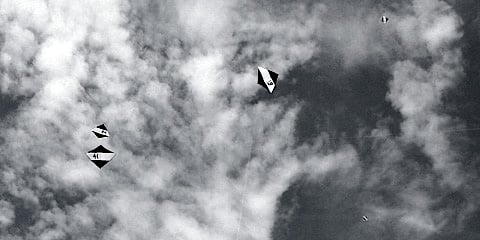
Ninjas at the Donaueschingen Kite Festival. There was no wind. © Markus Egger
Materials and weight
If you build your urban ninja kite heavier than indicated in the specs of this plan, it would be too jumpy and less fun to control. Use Icarex, not soft nylon textiles like Chikara or similar. And: the crisp sound of icarex polyester allows you to better locate your ninja at night in the dark.
the urban ninja ultralight production
If you prefer to fly this single line kite innovation right away, you can order a ready to fly urban ninja ul production. Choose a seasonal color from the icarex palette. Comes without a number or flying line, but in the famous black Tube, which is 1 meter long.
urban ninja: the numbers
The small edition of the urban ninja, the perfect gear for a spontaneous flight on asphalt around the corner. The urban ninja: the numbers comes with your optional personal number, in some very special Icarex colors and of course in the short 2 ft Tube.
Copyright, licence and workshops
This kite making plan is for non commercial, private use only. © ch 2026 horvath.ch

Creative commons attribution-noncommercial-no-derivative-works license
- attribution of the author
- no commercial use
- no processing
2006 – 2015: www.horvath.ch/ninja/
the_urban_ninja.html
since 2015: https://www.horvath.ch/en/
The-urban-ninja-kite-plan
If you are planning to build a couple of these light wind kites in a workshop, please contact us. There are some simple concepts to find a fair deal.
You may not trade off urban ninja kites against other kites or anything else.
We are a member of the American Kitefliers Association AKA.