Manual: floating without wind
1. assembly of the kite
2. the first flight
3. floating without wind
4. folding schemes, tube
5. setup, optional
6. security
1 Assembly of the kite
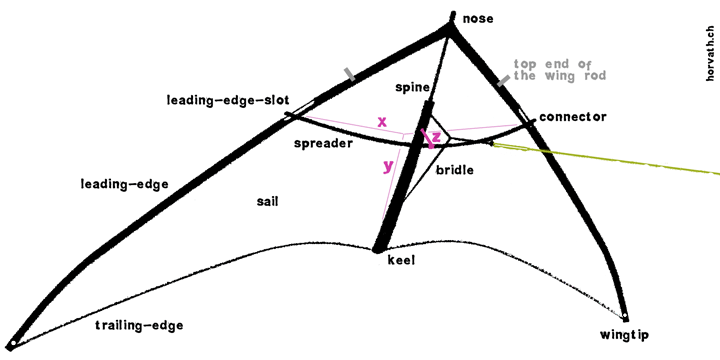
Insert one end of the spreader into one leading edge connector. Then the opposite end of the spreader, while bending it generously, exactly straight into the opposite connector. For high gliding flights mount the vinyl cap onto the nose.
Smoothen the wingtips and take a look at the position of the lines at the upper leading edge slots. They should face the small dots on the sail. To be prepared for a good flight, check the Z-line and the kite for symmetry. Done.
Wing design kites: First, assemble the wings. There's an upper and a lower thinner part. The complete wing frame starts somewhere between the nose and the leading edge slot, and ends in the wingtip.
I'll be back tiny:
untubing and tubing
2 The first flight
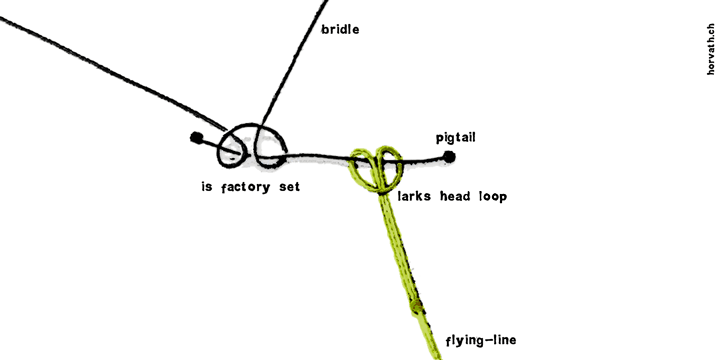
Lay plenty of flying line well sorted to the ground and connect the upper end to the pigtail with a larks head loop.
Start your first flight with a generous high launch, pulling the kite up using both hands, until it circles high above you around the zenith. Then try to do the most important move: a mellow gliding, slow landing.
3 Floating with zerowind kites
The Landing
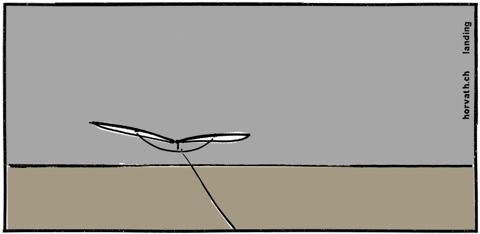
The most important move is landing, let go, break. The kite is landing softly on the ground, its nose pointing at the pilot. That‘s the classic starting position again.
Elegant: While the kite is gliding towards you, stall it with a sharp impulse half a foot above the ground and it will lie down in slow motion. That's a clean basis for the high start.
High start
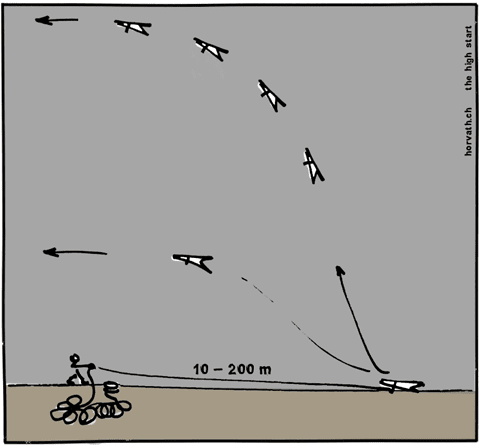
A generous launching method when there‘s plenty of space and very light wind to no wind. Use both hands, feel the pace for the optimal rising speed and keep it constant. This way a minimum length of line is enough to reach a good height.
Begin your very first flight with a high start and pull the kite up to the zenith and beyond. In light wind, the kite will turn by itself and fly away from you.
Hand starts
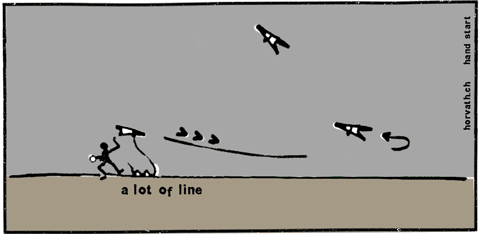
Lay out a lot of flying line to the ground and hold it loosely in one hand. With the other hand take the kite at the keel and throw it straight away, slightly downwards. Or hold your kite at its nose and start your flight with a 360 flat-spin or a 180 followed by a fly-away.
Up and over
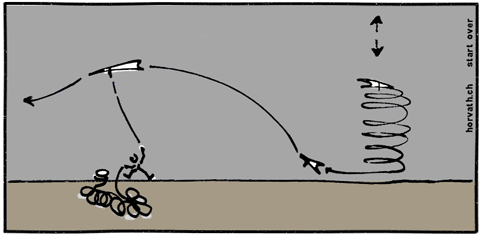
Pull the kite beyond the zenith and let it continue with a flyaway glide. Prepare a lot of line well sorted ready on the ground. With a light headwind, the kite will float on the spot before it will turn back into the wind and glide away from you.
Flat-spins
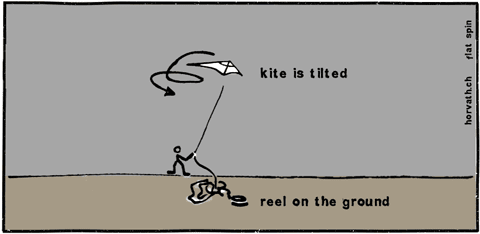
The flatspin is essential, especially when floating in confined urban space. Let your kite tilt sidewards by giving a good dose of line. Hit, with a sharp pull, the nose to the opposite side and it will fly a nice flat-spin. The sharper and shorter the impulse and then the more slack is given, the flatter the 360, 540 or 720 will be.
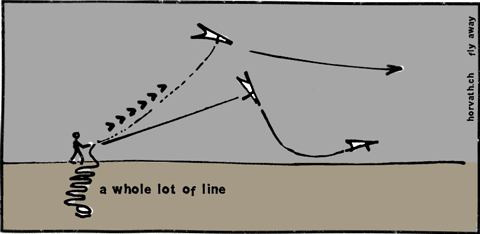
The 180 flat-spin initiates a nice long flyaway followed by pulling up the kite. By repeating this a couple of times, the kite will be on a good height in zero wind. Lay out plenty of flying line on the ground in advance before you fly these moves.
Fly-away and dive
Gliding towards the sunset, try to give plenty of line, so that nothing may stop its long fly away. Maybe check how and where the flying line is lying around on the ground.
The more aggressive style: Accelerate your kite with a heavy pull into a dive straight towards the ground. Kill this motion with a sharp impulse a few feet before the impact followed by a total slack. The kite will recover suddenly into a horizontal glide, and a few feet later will lift its nose. That‘s a good moment to pull the nose back towards you, then land or fly on.
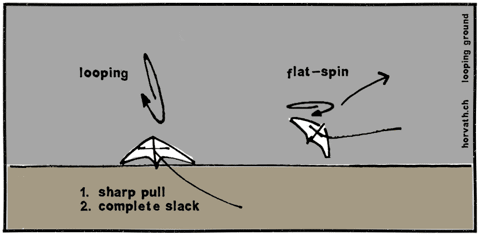
Groundwork, loops
The kite can land on its flexible wingtips and hold the position when stalled, if the wind is gentle. Tilted positions can be corrected with short pulls: the kite will always look for a horizontal balanced position, use this behaviour.
Let the nose fall gently forwards, slightly tilted and give a sharp impulse, followed by a total slack and the kite will perform a slow flat-spin one foot above the ground, with enhanced lift caused by the ground effect.
Actually, only Urban ninja the bad qualifies for the exactly vertical looping. But with a tilted setup, e.g. 45°, all of our kites can do it. This is quite a harsh move. Most spectacular directly from the ground and back to the same place, but also possible up in the air.
4 Folding scheme, tube
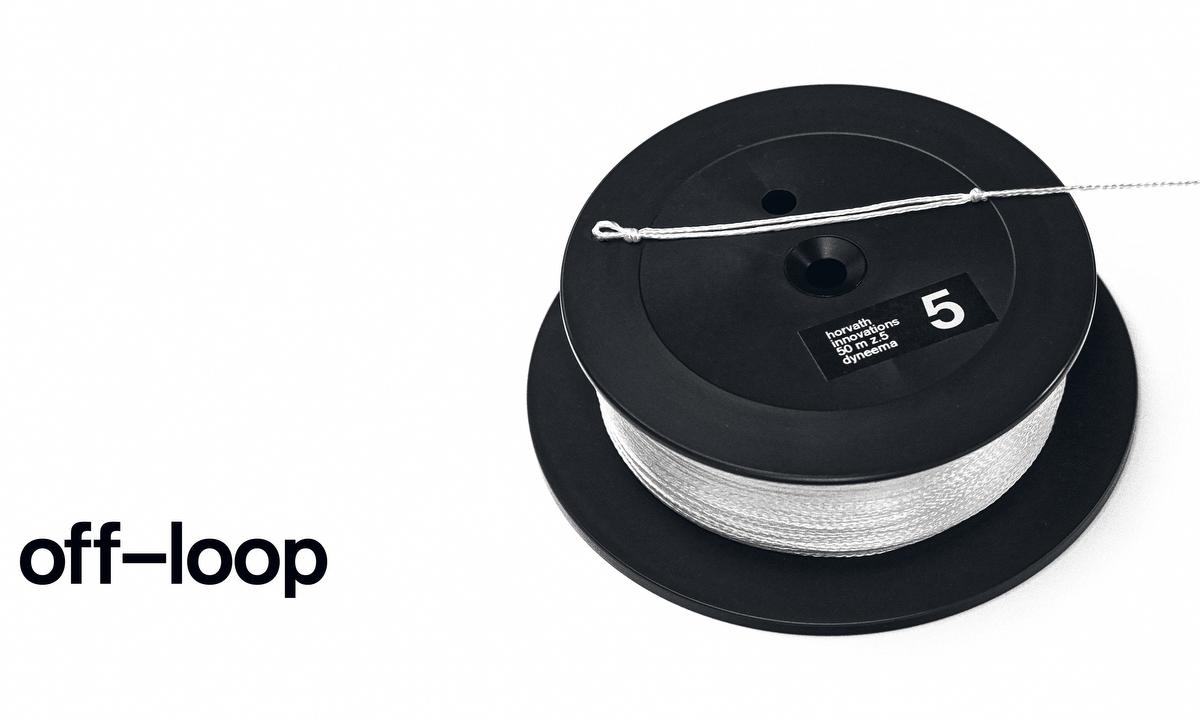
Your flight is finished with a beautiful landing. Remove the flying line from the pigtail by just pulling the off-loop, which you made yourself after the first couple of flights.
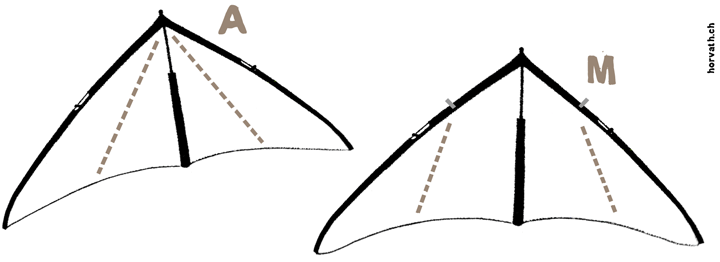
Now hold the kite only by the spreader, snap off both connectors with your thumbs and let the wings fall. This way, the kite folds itself along the spine. There are two schemes to fold the wings:
A : starting from the nose
M : from the top end of the wing rods
Schema M is used for kites with an extended trailing edge, like De tomaso superleggera, I'll be back and some others. You see the folding in the sail when unboxing the kite.
Roll the kite around the spine and push it, from bottom, nose ahead into the tube. Pack the more sensitive trailing edge part into the cap and close the tube on this side. Then close the tube at the top.
Never leave a wet or humid kite in a closed tube for a longer period. Icarex and Dyneema-Laminates are steam-tight, so it's best practice to lay out wet kites loosely and let them dry at least for one night, before you store them in the tube.
5 Setup, tuning
Factory setting
Your new kite is factory set up to how Horvath flies it. Optimized for zero wind, it tends to be agile, but not radical. Semi-static flights in light wind are also possible with this setup, with Stabilizer also in stronger wind.
Most leave their zero-wind kites the same way for the rest of live. For personal, subtle optimizations, changing some settings is possible.
Lateral tension of the sail optional
This essential setup of the kite is tuned by the lines: vary the length of the X-Line with the Y-Line to adjust the tension of the sail precisely.
To do this, open the double hitch at the keel and tension or loosen the Y-Line. The x-line, behind the sail on the picture, must always stay tight. Never let the whole load of the spreader tension the sail, that way the kite would not fly.
The slacker the sail is (from wing to spine to wing), the slower and more agile the kite will float. With a tighter sail, but just a bit, glide-sequences will be more consistent.
I'll be back and C'est la vie, darling both don't have a Y-Line: Move the stoppers of the leading edge connectors up or down to vary the effective length of the X-Line.
Tension along the spine optional
For slow gliding adjust a minimal, near zero tension of the sail along the spine. This is done with the short line at the nose. Factory setup: no tension at all.
A more tightened sail gives a nice subtle bend to the spine: The kite will lift the nose better and will be more agile, requiring less space for the moves. The urban ninja ul is profiled by the sail itself, floating always lively.
Dihedral optional
Adjust the dihedral of the kite with the short z-line. In the neutral setup, there are two loops around the spreader. Three loops will pull the spine closer down to the spreader, resulting in a pronounced dihedral and more stable glides.
Don't open the knot, just loosen and tighten the loop. With one single loop the z-line is longer and relaxes the spine, resulting in less lateral drag in flat-spins. The kite becomes more agile overall.
Bridle optional
- rather to front = light (flat attitude)
- rather to back = heavy (steep attitude)
The factory setting is between the two silver marks. With a lighter bridle the kite will react directly to the inputs, good for crisp flatspins. Due to reduced stability in climbing it's anytime easy to prepare a flatspin out of a tilted position, even very close to the ground.
A heavy bridle setup results in higher stability at climbing or in wind (high static flights, especially with Stabilizer), harder pull and less direct response in general. The factory setting supports a neutral, versatile flight characteristic, a bit on the agile side.
Stabilizer optional
When flying high in stronger winds you may want to insert the Stabilizer into some of the kites. In practice: a short line downtown, without Stabilizer, no wind. High flights with wind: a long line and the Stabilizer.
6 Security
- Switzerland: max. hight 60 m - 180 ft
- Germany: max. line length 100 m - 300 ft
Never fly:
- in stormy weather
- near powerlines and railroads
- near airports or roads
- beware of trees
- respect people and animals
Use, as much as possible, a short flying line, especially downtown. Laying the whole line out on the ground and putting the micro-winder into the pocket, you will be able to move around with the kite.